Photo Retouch
Status: In trial
Open, fix, and give many photos the same edit at once - in the store, offline.
About this app
(Try-out opened on a phone) The first button on the start card is “Add my photo”. The editor is built for a computer screen, so on a phone you bring photos in and view them in the Photos app; open the same address on a computer for the full editor. iPhone photos (HEIC) go in only where this browser can decode them, and the card says so first.
Photo Retouch is for retouching portraits and product shots in a photo studio's stores. The layout (tool bar on the left, options bar on top, panels on the right, the menus in the top bar) and the keys (J, B, [ ], Space-drag, Cmd+Z ...) are the ones the stores already use, so there is nothing new to learn. A newcomer clicks one picture under One-click looks; after fixing one photo by hand, Apply this edit to other photos gives the rest the same edit. Exported photos can carry the store's watermark.
At a glance
In one line: An app that retouches photos with Photoshop's layout and keys, and gives many photos one photo's edit at once. It works without the internet.
The screen
- Tool bar on the left: pick a tool (
Jis the spot healing brush) - Options bar on top: values for the chosen tool
- Panels on the right: the nine "One-click looks", Layers, History, Properties, and "HQ Actions"
- Menus in the top bar: File, Edit, Image, Layer... (submenus such as "Automate ›" open to the right)
Task 1. One-click look
- Open a photo or a session folder with File > Open (Cmd+O)
- Click one picture under "One-click looks" (for example Smooth skin)
- Drag the line in the middle to compare Before | After
Say: "Retouch the skin on this photo so it looks natural"
Task 2. The same edit on the other photos
- After fixing one photo, press "Apply this edit to other photos..." in the HQ panel
- Tick the photos and press "Apply to N selected"
- If it was a mistake, undo per photo under "Results and undo"
Say: "Apply this edit to the other photos too"
Task 3. Export with a watermark
- Choose File > Export > Watermark...
- Turn on "Add on export" and pick the text or a logo and the position
- Save with
Cmd+S: the photos inexport/carry it (the originals do not)
Say: "Add my watermark and export"
At a glance
In one line: An app that retouches portraits with Photoshop's layout and keys. It works without the internet.
The screen
- Toolbar on the left: pick a tool (
Jis the spot healing brush) - Options bar on top: values for the chosen tool
- Panels on the right: Layers, History, Properties, and "HQ Actions"
- Menus on the top bar: File, Edit, Image, Layer...
Task 1. Open photos
- Choose File > Open
- Choose the session folder
- Press "Open as session"
Say: "Open this folder in Photo Retouch"
Task 2. Studio default retouch
- Look at the "HQ Actions" panel
- Press "Run Studio default retouch"
Say: "Retouch the photos in this folder naturally"
Task 3. Save, then next photo
- Press
⌘S - Press "Next"
Say: "Close Photo Retouch"
Basics
Photos open by "session" folder (one shoot): the photos in raw/ one after another; fixed photos go to edit/ (full size) and export/<profile>/ (the size to send). The originals in raw/ are never changed. Think of fixing one print on the work table and pinning a note "do the rest like this one". Do this now: File > Open (Cmd+O), pick a session folder, "Open as session".
How to use it
One-click looks (easy mode)
- The "One-click looks" tab (right, middle) shows nine small pictures of this photo: Natural, Bright, Warm, Cool, Smooth skin, Product on white, Black & white, Vivid, Soft film.
- Click one: it is applied at once and the view splits "Before | After"; drag the line to compare ("Split off" ends it).
- Another click replaces it (looks do not pile up). "Original" takes it away; Shift+Cmd+Z brings it back.
- The same from Image > One-Click Looks > ...
On a phone (nanumos.com/retouch)
Opened on a phone, the page shows one photo filling the screen and eight big buttons below it. No install, no sign-up, and the photo never leaves the phone.
- Press "Photo" and pick a picture from the album or files (an iPhone HEIC photo opens as it is when the browser can read it - Safari does, and Chrome / Edge do when the computer's own video decoder reads HEVC; if not, the page says to turn it into a JPG)
- "Looks": swipe the strip under the photo and press one of the nine one-click looks (a small picture previews each) or "Original"
- "Crop": 1:1, 4:5 and 9:16 cut the middle in one press; "Free" lets you drag the part to keep, then press "Done"
- "Rotate" turns 90 degrees per press, "Light" is a slider (darker to brighter), "Spot" removes a blemish where you tap
- Hold "Compare" to see the original; let go and the edit is back. Two fingers apart zoom in, one finger moves the photo
- "Save" writes a JPG (a PNG photo stays PNG), then "Share" (on phones that support it) or "Download"
A large photo (long side over 4096 px) is made smaller to 4096 px on the long side when opened, to spare the phone's memory, and is saved at that size - the page says so when it opens. The full editor (layers, panels, shortcuts) is on a computer.
Fix one photo by hand
- The HQ panel's Run studio action,
J(spot healing) for blemishes, the Skin smoothing slider. - Levels (Cmd+L), Curves (Cmd+M), Hue/Saturation (Cmd+U), adjustment layers.
- Select the upper layer, then press Option+Cmd+G or right-click its row and choose Create/Release Clipping Mask. The upper pixels or adjustment affect only the visible shape of the pixel layer below. Repeat to release; Cmd+Z undoes it.
- Size and angle: Cmd+T (Free Transform). A corner keeps the proportions, Shift frees them; drag outside the box to rotate (Shift: 15 degree steps); Cmd+corner distorts, Cmd+side skews, Cmd+Option+Shift+corner makes perspective, Option works about the reference point (the centre). The bar on top takes X, Y, W, H and the angle as numbers; right-click lists Scale, Rotate, Warp, Rotate 180/90 and Flip. Enter applies, Esc cancels, Cmd+Z inside the transform undoes the last drag. The Background becomes "Layer 0" when transformed (as in Photoshop). Type and shape layers are transformed as letters and lines, not as a picture: they stay sharp, the text stays editable and a shape keeps its stroke width. Type takes no Distort or Perspective (as in Photoshop), and its Warp is a warp style (Arc, Arch...). Image Size, Canvas Size, Image Rotation and Crop also keep type, shapes and vector masks live while they move and turn them.
- Crop: C. Drag the box, drag outside it to tilt, Straighten in the bar (or Cmd-drag along the horizon) levels the photo; the ratio list and X (swap), Enter crops. Shift+C is the Perspective Crop (fit four corners to a rectangle in the photo, Enter).
- Image > Canvas Size (Option+Cmd+C), Image Rotation (180, 90, Arbitrary, Flip Canvas), Trim; Image Size (Option+Cmd+I) with its Resample list (Automatic, Nearest Neighbor, Bilinear, Bicubic, Smoother, Sharper).
- Cmd+S saves, Next goes on.
Liquify (Shift+Cmd+X)
A window opens over the photo with nine tools: Forward Warp (W) pushes what you drag, Bloat (B) and Pucker (S) swell or shrink, Twirl (C, Shift+C for the other way) turns, Push Left (O) moves content to the left of your drag, Reconstruct (R) brushes the original back, Freeze Mask (M) paints a red guard that nothing can move, Thaw Mask (D) takes it off. Size, Density (how much of the brush stays full strength) and Pressure are sliders; Restore All gives the original back. Return keeps it as one step, Esc drops it. Think of the photo as a rubber sheet pinned at its corners: the tools stretch the sheet, the photo is redrawn from the untouched original each time, so many small strokes do not blur it, and the sheet is never allowed to fold over itself. Do this now: open a photo, press Shift+Cmd+X, drag slowly across a cheek with Forward Warp, then press R and brush over it.
- Technical details: the sheet is a mesh with one node every 4 pixels; every stroke changes the nodes it touches and the touched rectangle is resampled (bicubic) from the original pixels. A selection protects what is outside it. Face-Aware Liquify is not there (the app has no face finder yet).
Keys for all-day work (Photoshop's hand movements)
- Picking layers:
⌥[the layer below,⌥]the layer above,⌥,the bottom one,⌥.the top one.⇧⌥[/]adds the next layer to the selection.⌥⌘Aselects all layers. - Right-click a layer row: Layer Properties (type a name) · Blending Options · Edit Adjustment · Link / Select Linked Layers · Copy / Paste / Clear Layer Style · Hide Others · Color (red to gray label, also saved in the file) · Merge Visible · Flatten Image. Each undoes with one ⌘Z.
/locks transparent pixels (while cropping it turns the crop shield on and off);,.step the Brushes panel's tip (Shift = first / last).⌥⌘Deletefills the selection back to the picture as it was opened (Fill from History).⌃Tab/⇧⌃Tab(or⌘\) cycle the open documents.⌘PPrint,⇧⌘RLens Correction,⌥⇧⌘KKeyboard Shortcuts and⇧⌘A` Camera Raw Filter run the command the menu shows beside the key.- Inside Liquify:
RReconstruct ·CTwirl ·OPush Left ·FFreeze Mask ·DThaw Mask. While typing,⇧⌘Q= tracking 0,⇧⌘X/⌥⇧⌘X= horizontal / vertical scale 100%,⌥⇧⌘A= Auto leading. - Edit > Check Spelling · Adobe PDF Presets · Remote Connections · OpenColorIO Configuration and Window > Workspace > Keyboard Shortcuts & Menus open their windows (PDF, remote servers and OCIO are not things this app does, so the window says why).
- Technical details: the layer colour is the PSD's
lclrand one undo step. Fill from History is onehbrushover the whole picture, so it follows the selection.
Panels (Essentials workspace)
Window > Workspace > Essentials gives the right side two columns.
- Icon strip (the narrow left column): History and Actions folded to icons. Click an icon and that panel opens beside it; a click on the photo folds it again.
- Panel column, top down: Color · Swatches · Gradients · Patterns, Properties · Adjustments, Layers · Channels · Paths. A tab brings its panel to the front.
- Drag a tab sideways to change the order inside its group. Double-click the empty part of a tab row to fold the group to its tabs (again to open it).
- ≡ at the right of a tab row opens the panel's menu. Close closes that panel, Close Tab Group the whole group.
- » at the top of a column folds it to icons (the photo gets wider), « opens it again.
- A closed panel comes back from the Window menu by its name (choosing the panel in front closes it; ✓ marks the panels shown). F6 Color, F7 Layers, F8 Info.
- Window > Workspace > Reset Essentials puts everything back.
Per panel:
- Color: the two squares are the foreground and background colours (the one clicked is edited). The big square sets saturation and brightness, the strip on the right the hue. ≡ switches to Grayscale, RGB or HSB sliders. Clicking the colour squares in the tool bar opens this panel too.
- Swatches: the top row is recently used colours, below are folders (RGB, Grayscale, Pastel, Light, Dark). Click = foreground, Cmd-click = background. The buttons below add a folder, add the foreground colour, delete the one picked. Changed swatches are kept.
- Gradients: the one picked is what the Gradient tool (G) paints. Drag across the photo (Shift: 45 degree steps); the options bar has Linear, Radial, Angle, Reflected, Diamond and Reverse. With a selection only the selection is painted.
- Patterns: drag a pattern onto the photo for a new Pattern Fill layer (inside the selection if there is one). + makes a pattern of the selection (or the whole photo).
- Channels: RGB, Red, Green, Blue and the alpha channels made by Select > Save Selection. Click a row, or Cmd+2 (RGB), Cmd+3/4/5 (red, green, blue), Cmd+6... (alpha) to see that channel alone in grey. The eyes show several at once; an alpha channel shown with RGB tints what it hides red. Cmd-click a row (or Option+Cmd+3...) to make it the selection (Shift adds, Option subtracts). Buttons: load as selection, save selection as channel, new channel, delete.
- Version History: "Save Version" keeps the document with its layers as a PSD (the latest 20 per document) and lists it by time. "Open" (or double-click) opens that version as a new untitled tab, so the document and its file are untouched. Kept in
presets/versions/. - Comments: review comments on the picture. "+" pins a blue bubble in the view's centre and opens its text field; double-click edits. The check mark resolves or reopens, "Hide resolved" hides resolved ones. Kept per file in
presets/comments/, back when you reopen the photo. One person's notes, not shared. Over the panel: Up/Down picks, Enter types / opens, Delete removes. - Info: R, G, B of the point under the pointer and C, M, Y, K (an approximation without a colour profile), the position in pixels, the selection size, the document size.
- Navigator: the whole photo small, the red box is what the window shows. Click or drag in it to go there; the slider and the mountain buttons zoom.
The scroll bars at the photo's right and in the status row move the photo too.
Size, canvas and smart objects (where Photoshop has them)
- Image > Image Size (⌥⌘I): type the width and height in pixels, percent, inches, centimetres and more (decimals work). Fit To offers print sizes such as 4 x 6 in 300 dpi. With Resample off the pixels stay and only the resolution changes (one undo brings it back). The resolution is saved into PSD, JPG and PNG files.
- Image > Canvas Size (⌥⌘C): turn on Relative to type only what to add, and pick the side the photo stays on in the 3 x 3 Anchor. Image Rotation > Arbitrary takes decimal angles such as 12.5; Trim cuts only the sides you tick.
- Layer > Smart Objects > Convert to Smart Object: making it small and big again keeps the quality (the original pixels are kept). Paint after Rasterize. Saved as a PSD it is a pixel layer for now.
- With a selection, ⌘J puts only the selected part on a new layer, ⇧⌘J cuts it there. Rename a layer by double-clicking its name or with Layer > Rename Layer.
- Merge Visible (⇧⌘E) keeps hidden layers; Flatten Image asks first when there are hidden layers.
Fade, Apply Image, fill layers and filters (where Photoshop has them)
- Edit > Fade (⇧⌘F): choose how much of the last filter, adjustment or stroke stays, with an opacity and a blend mode. It is on only right after a filter, an adjustment or a stroke (greyed otherwise); one undo takes it back.
- Image > Apply Image: mix the merged picture or another layer into the current layer, picking a channel (RGB, Red, Green, Blue, Transparency) and Invert. The Add and Subtract blends have Scale and Offset: Subtract with Scale 2 and Offset 128 makes the high-frequency layer of frequency separation.
- Layer > New Adjustment Layer > Invert, Layer > New Fill Layer > Solid Color / Gradient: a fill layer is a picture-sized shape layer (foreground colour, or foreground-to-background gradient); change its colour in the Properties panel. Pattern is not built yet.
- Filter > Stylize (Find Edges, Solarize, Emboss, Diffuse) and Filter > Distort (Pinch, Spherize, Twirl, Ripple, ZigZag, Polar Coordinates): inside the selection if there is one, else the whole picture. Same names and places as Photoshop; the pictures they make were not compared with Photoshop's own output.
- Filter > Pixelate (Crystallize, Pointillize, Facet, Fragment, Color Halftone, Mezzotint), Render (Lens Flare, Fibers), Stylize (Wind, Tiles, Trace Contour), Distort (Wave), Blur Gallery (Field, Iris, Tilt-Shift, Spin Blur) and Filter > Lens Correction: pick values in the dialog, the picture previews them, OK is one history step. With a selection they work inside it only. Blur Gallery's pins are not dragged on the picture: the centres are numbers (percent of the picture).
Image > Mode, Match Color, Reveal All, Select > Focus Area
- Image > Adjustments > Match Color: pick another layer (or Merged) as the look to copy; Luminance and Color Intensity make it brighter / more colourful, Fade takes some back, Neutralize removes the colour cast of the photo instead. One undo step.
- Image > Mode > Grayscale turns every layer gray in one step. Bitmap (black and white only: threshold, dithering or a pattern) and Indexed Color (at most 256 colours) first merge the layers and say so. The tick in the Mode menu shows what the pixels are. CMYK, Lab, Duotone and 16-bit are not built.
- Image > Reveal All: widens the canvas to show layers that stick out of it (for example from a PSD). It says so when nothing is outside.
- Select > Focus Area: selects what is sharp. Move In-Focus Range to include softer parts, Image Noise Level to ignore grain; red shows what is left out. Select > All Layers / Deselect Layers pick layers in the Layers panel.
More of the Type menu (where Photoshop has it)
Technical details - engine rt_text.c + retouch_text_ot.inc (GSUB lookups 1, 3, 4, 5, 6, 7; the bidi reordering rule L2), window rtui_text2.inc. Action names: type_ot:<feature> type_dyn:1-4 type_match_font type_fpv:0-5 type_lang:<key> type_update_all type_missing type_lorem type_default_load/save type_morefonts prefs_type vmask_link (the assistant runs the same names). In a PSD, Standard / Discretionary Ligatures and the anti-alias mode use Photoshop's keys, the rest our own (ZeusOT, zDyn) - only in layers that use them.
View and Edit menus (where Photoshop has them, with its keys)
- Proof Setup > Custom..., Working CMYK and its Cyan / Magenta / Yellow / Black / CMY plates, Legacy Macintosh RGB (Gamma 1.8), sRGB, Monitor RGB, red / green colour blindness, then Proof Colors (Cmd+Y) turns it on and off. It changes the screen only, never the file. Gamut Warning (Shift+Cmd+Y) covers in grey what would lose most of its colour in print. The program carries no press ICC profile, so CMYK is a model (strong colours lose chroma, black is not fully black, paper is not white), not an exact print colour. Colour blindness uses the standard transforms (Machado 2009).
- Pattern Preview repeats the picture on all sides to check the seams (Show > Pattern Preview Tile Border toggles the seam lines).
- Extras (Cmd+H) hides grid, guides and edges at once; Show switches them one by one (Layer Edges, Selection Edges, Target Path, Grid Cmd+', Guides Cmd+;, Canvas Guides, Notes, Pixel Grid from 500 %, Count, Smart Guides, Slices, Artboards, Mesh, Pins). Artboards, slices, counts, meshes and pins do not exist in this program yet, so those only keep their switch. Show Extras Options... sets them at once and the grid (Gridline Every, default 1 inch; Subdivisions, default 4).
- Snap To: Guides, Grid, Layers (the edges and centres of the other layers' content), Document Bounds. The Marquee tools stick to the nearest line (only to what is on, and only what is shown).
- Guides: New Guide... (orientation and position; units px, in, cm, mm, pt, pica, %), New Guide Layout... (columns and rows with number, size, gutter; four margins; clear existing), New Guides from Shape (the four sides of a shape layer), a guide clicked with the Move tool is selected (Shift adds) for Edit / Clear Selected Guides, Clear Canvas Guides. Slices, 32-bit Preview and Fit Artboard have nothing to act on, so they are greyed as in Photoshop.
- Edit > Find and Replace Text... finds and changes the characters of type layers (case, whole word; Find Next, Change, Change All as one undo step). Edit > Stroke... paints the selection's edge inside, centre or outside (width, foreground / background / white / black, opacity, one undo step). Edit > Purge: Clipboard, Histories and All (they cannot be undone, so it asks first), Video Cache. Edit > Customize Save Dialog File Formats... takes formats out of the Save dialog's list.
- Each command is an action of the same name, so the assistant (⚡) runs it exactly as the key does.
Preferences, Analysis and Variables (where Photoshop has them)
If the text and buttons look small: Edit > Preferences > Interface has "UI Scaling" (Auto, 100%, 150%, 200%) and "UI Font Size" (Small, Medium, Large, Larger). The change is immediate and kept. Auto follows the screen (Retina: 2x). Menus, the options bar, panels and tool icons grow together; the photo zoom (View > Zoom In / Out) is separate.
- Edit > Preferences (Cmd+K): pick a page on the left; a change applies at once and is kept for next time. Tools: "Use Shift key for tool switch" and "Zoom with scroll wheel"; Transparency: the checkerboard's size and colours; History: the memory cap each document uses; Image Processing: the default method in Image Size. The Scratch Disks, Plug-ins, Technology Previews and Product Improvement pages have nothing to set and only say what we do instead.
- A row already recorded keeps the scale it was recorded with. Select Data Points chooses the columns of the log and of its export.
- The Ruler Tool: drag a line (drag an end to move it). The Count Tool: each click numbers a mark (Option-click removes one, Esc clears). Picking another tool ends the mode.
- Image > Analysis > Place Scale Marker: a bar of the length you give (with an end tick at each end) as a new layer. There is no text label yet.
- Image > Variables > Define: pick "Visibility" and "Pixel Replacement" per layer. Data Sets makes sets (a new one takes the current state); change the values, then Image > Apply Data Set applies one in a single step (one undo). Pixel Replacement pictures come from the open photo's folder and are fitted into the layer and centred. Text Replacement is not built. Layers renamed or deleted since are skipped and counted.
- Window > Options, Tools and Contextual Task Bar show and hide those bars. The task bar shows "Select and Mask, Fill, Inverse, Deselect" under the canvas when there is a selection, "Select Subject, Fit on Screen" when there is none. File > Browse (Opt+Cmd+O) is the Open window. Adobe's services (Stock, Express, Share for Review...), Generative Upscale and the plug-in menu are in Photoshop's places but greyed.
More Window, View and Select: document arrangement, workspaces, Find Layers (Photoshop's places)
- Window > Arrange: with two or more documents open (⌘N, Image > Duplicate) lay them out together in the canvas: Tile All Vertically / Horizontally, 2-up, 3-up, 3-up Stacked, 4-up, 6-up, Tile. Each window has a title bar and a click on another window makes that document the current one (its cell becomes the canvas, the tools work in it as usual). Float in Window makes the current document a floating window (drag its title bar), Float All in Windows and Cascade do all of them, Minimize (⌃⌘M) folds the floating window to its title bar and Bring All to Front undoes it. Consolidate All to Tabs is the usual look. Match Zoom, Match Location and Match All put the other windows at the current zoom and centre point; the view turn is one value for the window, so Match Rotation tells you they already agree. Greyed with one document.
- Window > Application Frame: on, floating document windows stay inside the editor window; off, they can be dragged over the panels too.
- View > Flip Horizontal: mirrors the picture on screen only, to judge a composition. The file is untouched; brushes, selections and guides land where you press on the mirrored screen. Again to switch back.
- Window > Workspace: Essentials (Basic), Motion, Painting, Photography and Graphic and Web rearrange the panels for that work. New Workspace... saves where the panels are and which bars show under a name (eight at most); My Workspaces... applies or deletes them. Reset Essentials restores the Essentials layout and Lock Workspace stops panels being dragged or closed. The workspace you used last comes back when the window opens again.
- Select > Find Layers (⌥⇧⌘F): filters the Layers panel by part of a name (layers inside closed groups show too); the ✕ on the strip above the list clears it. Select > Isolate Layers keeps only the selected layers in the list (again to switch off; adding or deleting a layer ends it). Select > Sky selects the blue sky and white clouds joined to the top of the picture by colour. It is a colour rule, not AI: a sea of the same blue as the sky, or a hazy sky edge, can be wrong, so refine it with Select and Mask. Select and Mask (Opt+Cmd+R) is a workspace. Its left tools are Quick Selection (W), Refine Edge Brush (R), Brush (B), Hand (H) and Zoom (Z); with no selection at all, Quick Selection or Brush builds one from nothing (Option takes away). The Radius works only where the Refine Edge Brush painted, and Smart Radius searches narrowly at hard edges and widely at soft ones (hair, fur). F steps the view mode, J shows the edge, X shows the original. Decontaminate Colors replaces the background colour left on the edge with the colour just inside and sends the result to a new layer. Cancel leaves the picture as it was. Filter > Liquify has Smooth (E), Face (A), Hand (H) and Zoom (Z) tools, and Tab hides and shows the right-hand panel. The Face tool does not find faces by itself: a default set of face points (eyes, nose, mouth, chin) appears, you drag them onto the face, and 14 sliders (eye size, nose width, smile, jawline ...) move just those regions. In the Paragraph panel, Hyphenate and Every-line Composer split long English words at the line end and balance the line breaks of the whole paragraph (Korean text is unchanged).
- Window > Textures: twelve generated textures (Paper, Canvas, Sand, Granite, Wood, Linen, Leather, Brick, Waves, Clouds, Grid, Noise). A click lays one over the picture as an Overlay layer at 60%; one undo removes it.
- Window > Timeline: frame animation. How the layer eyes are set is one frame (+ duplicates it); a click on a frame shows it on the canvas. A click on the time below the number cycles 0.1, 0.2, 0.5, 1, 2, 5 s, ▶ plays the frames in turn (↻ loops) and Export PNG writes
<name>-frames/001.png ...beside the photo. There is no video timeline. Adobe Stock, Content Credentials, the AI Assistant Editor and the plug-in rows (panel, browse, manage) stay greyed rather than pretend. - The first button of the Layers panel's footer (the chain) links two or more selected layers so they move together (Layer > Link Layers).
Which photo files can it open
JPEG, PNG, WebP, GIF, TIFF, BMP, ICO, PSD, AVIF, HEIC/HEIF (iPhone photos), JPEG XL, SVG and camera RAW (DNG, CR2, CR3, NEF, ARW, RAF, ORF, RW2 ...). Open lists all of them (nothing is greyed out). An animated GIF or WebP opens as its first frame. A RAW this app does not develop itself opens through the large preview picture the camera stores in the file, and the status line says so. A format that cannot be opened (for example HEIC or JPEG XL in a browser that cannot decode it) gets its name and one step that helps (open it in another browser, or convert it to JPEG or PNG). In the Mac app, Open shows the Mac's own file panel at once.
Exchange Photoshop files (PSD) with their layers
- File > Open (Cmd+O) opens a
.psd. Layers, groups (folders), masks, clipping, adjustment layers (Levels, Curves, Hue/Saturation, Brightness/Contrast, Invert), blend modes, opacity, fill and locks appear in the Layers panel as Photoshop showed them. - Groups: select a layer and press Cmd+G (Group Layers), Shift+Cmd+G (Ungroup). The triangle before a folder closes and opens it. Order: Cmd+] Cmd+[ (one step), Shift+Cmd+] Shift+Cmd+[ (front, back).
- Locks: the four buttons above the list (transparent pixels, image pixels, position, all).
/toggles the transparency lock, Cmd+/ lock all. Shift+click a mask thumbnail to switch the mask off (red X). - Cmd+S saves to the same
.psd. Layer effects, type, smart objects and anything the app does not read stay in the file unchanged, so Photoshop opens them again. If you opened a JPG and added layers,edit/gets the JPG and a PSD of the same name. Export As (Shift+Cmd+S) also offers PSD. The newer adjustment layers (Brightness, Color & Vibrancy, Sharpness & Dehaze, Grain, and Exposure, Vibrance and the others of New Adjustment Layer) stay adjustment layers when you open the file here again; Photoshop has no public format for the first four: Photoshop opens them as empty layers, so the picture there is without them (apps that only show the file's preview show it with them). - If the file holds things the app cannot draw yet (layer effects, vector masks, some adjustments), the status bar says so when it opens, and until your first edit the window shows the picture Photoshop stored.
- Saving is safe: a PSD is first written whole to a temporary file beside it and flushed to the disk, then read back - the number of layers and the size must match the document - and only then does it replace the old file. If memory runs short or the disk fills up and anything does not match, the save stops with "Could not save the PSD" and the old file stays untouched: a file with only some of the layers is never left behind. An existing file is also kept as a Version before it is replaced.
- Technical details: write to
.part->fsync-> read back the header, every layer record, channel lengths and section lengths against the bytes on disk (no pixels decoded: about 4 ms for 20 layers at 24 MP) ->rename->fsyncof the folder. Testtests/test_retouch_psd_save.py: 20, 50, 100 layers, 50 MP, PSB, and for every k-th failed allocation, failed write, lost write and failed fsync: written whole, or the old file as it was.
Apply this edit to other photos
- After one photo is right: the HQ panel's Apply this edit to other photos... (or File > Automate > Apply This Edit to Other Photos...).
- The dialog lists what is copied (e.g. Warm · HQ action (skin 45 %) · Curves) and what stays (local edits such as spot heal or brush, whose place differs on every photo).
- Tick the photos (all but this one at first) and press Apply to N photos.
- It runs in the background; keep working. The panel shows "Applying 7/49 · about 40 s left"; Stop stops it (finished photos stay).
- Results · Undo: Undo on a row puts that photo back (an earlier edit file comes back byte for byte); Undo all too.
- Opening a synced photo shows the edit as one history step, so Cmd+Z there takes it off as well.
Watermark
- File > Export > Watermark... (or the HQ panel's "Watermark...").
- Turn on "Add on export", type the text (Korean typing works: the 가/A button or Shift+Space switches) or pick a logo (PNG; its transparent parts show the photo).
- Position (9 places), opacity and size (% of the photo's short edge) show at once in the preview.
- It goes on Export As, the
export/<profile>/files of Save, Batch, and Apply to others - never onedit/(the full-size master).
Batch
File > Automate > Batch: the store's standard edit on a whole folder; run it again after a stop and finished photos are skipped.
Previous versions
Every Save (⌘S) keeps the photo it overwrites. File › Previous Versions... lists the earlier saved photos, newest first; pick one to see it beside the photo now. Restore This Version puts it back and the editor opens it again. Batch and export only make new files, so they keep no versions.
A photo studio's everyday jobs
- Transparent photos (cut-outs): pick PNG in Export As and the transparent part stays; the preview on the right shows it on a checkerboard. A JPG lays it on white.
- Export larger: type a width larger than the photo in Export As and it is saved enlarged (as Image Size does).
- File > Automate > Batch / Image Processor, section 「⑤ File names」: turn on Rename and type a prefix, suffix, number digits and the first number to save as
studio_001.jpg(the old name and today's date can be added too). An example shows under the boxes. - After 「Apply this edit to other photos」 the Prev / Save / Next buttons at the top of the HQ panel stay clickable.
- Select All (Cmd+A) alone does not ask 「Save changes?」. Auto Tone brightens a very dark photo to a sane level instead of blowing it out.
- By voice: 「crop to 3:2」「make the long edge 1000」「rotate 4 degrees」「add the text SALE」「new layer」「remove this object」「undo」「save as PSD」. Saving a new file and deleting a layer wait for the [Allow] card; the original is never overwritten.
Ask the assistant (⚡)
"Make this one warm", "the same on the rest", "export today's folder in black and white for the web", "watermark bottom right": the assistant presses the same buttons. Changing other photos' edits and the watermark setting happen only after you press [Allow] on its card.
"Save it to the desktop" saves the picture as you edited it as a new picture file (JPG) on the desktop. It picks a free name and never writes over another file, so it happens right away without a card, and an icon appears on the desktop. Hand that picture to Video Retouch for a short clip ("Make my edited picture a video and play it").
How it works
The desktop opens the window; a separate program (rtui) draws the picture, tools and panels in it. Each whole-photo change (levels, curves, a look, the HQ action ...) is written down as one line of a "recipe"; an undone step leaves the recipe too. Apply-to-others hands that recipe to the retouch command (the batch's engine), which redoes it on each photo from its original - so it looks the same whatever the photo's size.
The work is a job the desktop runs in the background, so the window never waits. Before a file is replaced, the old one moves to .retouch-sync/<n>/undo/ and that is written down first, so a stop (or a power cut) leaves every photo undoable. Photos never leave the device.
The menus are in the screen's top bar; submenus such as "Automate >" and "One-Click Looks >" open at the right when the pointer rests on them (or with the Right arrow). "About Photo Retouch..." in the app menu shows the version and what it does.
Window arrangement gives every open document a cell. The current document's cell is the canvas (where the picture, the tools and the rulers work); the other cells are only drawn, at the zoom and place that document last had. A click on another cell makes its document current and the cells swap roles. Flip Horizontal mirrors the picture after it is drawn and mirrors the pointer position when it is turned into a picture position, so what you press stays where you press.
When you open a big JPEG, the picture does not wait for the whole file to be read. For a very large photo a small, blurry version of the whole picture appears first (the file's own colour averages, one dot for every 8 x 8 block of the photo), then the sharp rows are drawn in place from the top down, and the finished picture takes the window at the same size and position - nothing jumps. A thin progress bar shows after a moment. This is like a magazine page that first shows its colours and then its print: the window keeps drawing every frame, so it never looks frozen. Whatever you press while the photo is still arriving waits and is done right after it is ready; Esc stops the opening. The before/after copy and the zoom cache are made afterwards, a little at a time. Moving to the next or previous photo of a photo set (session), and the first photo when the set opens, work the same way - a 50-megapixel photo shows its first look in about 0.03 s. (Photos turned by the camera, progressive JPEGs and other formats open the usual way.)
Technical details - user/retouch/rt_jprog.inc reads a baseline JPEG in slices of about 20 ms with the same decoder pieces the normal open uses, so the pixels are identical (tests/test_retouch_jprog.py). Pass 1 (20 MP and up) reads only each block's DC value into a w/8 x h/8 picture; pass 2 decodes one MCU row at a time and converts it to RGB; rtui.c (OJ) paints the rows, keeps the window's events in a queue until the picture is in, and fills orig and the zoom cache in slices. Feel test: tests/retouch_openfeel.py.
Technical details
Engine user/retouch/rt.c; window user/retouch/rtui*.c (recipe, job and undo rtui_sync.c, looks rtui_easy.c, watermark /tmp/retouch/job.<n>.args; the desktop runs u -m max -w "<photo folder>" retouch job ... (a program's own child would get 16 MiB and no write authority). A text watermark is drawn once with the window's font into watermark-text.png, so the batch lays the same picture.
FAQ
Why does it open on a wall of paintings?
When Photo Retouch opens without a photo, twelve well-known paintings wait on its first screen (The Starry Night, Water Lilies, Girl with a Pearl Earring, The Great Wave off Kanagawa, The Birth of Venus, The Kiss, Mona Lisa, The Night Watch, Sunflowers, Impression, Sunrise, Ssireum, Dano Pungjeong). Tap one to retouch it at once, or tap Start without a photo for the empty editor. To hide them, turn off Settings > Sample Files > "Show the painting gallery in apps".
Does it open camera RAW?
Yes. DNG, CR2, NEF, ARW and RAF are developed once when they open — like printing a film negative, the values the sensor recorded become a photo. White balance comes from the file; colour from the matrix inside a DNG, and for other makers from a match against the JPEG the camera stored in the file. CR3 and compressed RAF open as that camera JPEG for now, and the window says so. What to do now: open a RAW, retouch as usual, then export JPEG or TIFF.
Technical details — Our own decoder (user/imgfmt/zraw.c; not LibRaw — share-obligation licence). Black and white points, demosaic, camera to XYZ to sRGB, the sRGB curve, developed in 16 bits; the editor gets 8 bits. For a 16-bit TIFF use the terminal: u imgview --develop photo.NEF photo.tif. Save formats: JPG, PNG, TIFF, WebP (lossless), PSD. TIFF with LZW, Deflate, PackBits or JPEG compression, 16-bit and several pages (the first page) opens.
Does Apply-to-others copy the blemishes I healed?
No. Spot heal, brush, clone and liquify fix one place, which differs on every photo, so they are not copied; the dialog says how many stay.
I applied it by mistake. Can I undo?
Yes: Results · Undo, per photo or all. An edit file you had made before comes back byte for byte.
Does type get blurry when I enlarge or turn it?
No. Type stays "letters + size and direction", not a picture - like swapping in bigger metal type instead of photographing small type and stretching the photo. Cmd+T to twice the size and the Character panel shows twice the size; saved as PSD, Photoshop opens it as editable type. Try it now: pick a type layer, Cmd+T, drag a corner, Enter.
Technical details: the transform goes into the type layer's matrix (PSD TySh xx xy yx yy tx ty) and the font size stays. Shapes and vector masks move every anchor and handle of their path (the stroke width stays, also in Image Size, as in Photoshop; layer effects follow Image Size's "Scale Styles"). When type cannot take a transform (Perspective Crop), only that type layer becomes pixels and the status line says so.
Does the computer freeze during 50 photos?
No. The job runs on its own; strokes and zoom in the window keep working, and the time left is in the panel.
Is the watermark put on the originals?
No: only on what is exported (export/, Export As).
Does it work offline?
Yes. Open, retouch, save, batch and apply-to-others all run on the device.
Try this
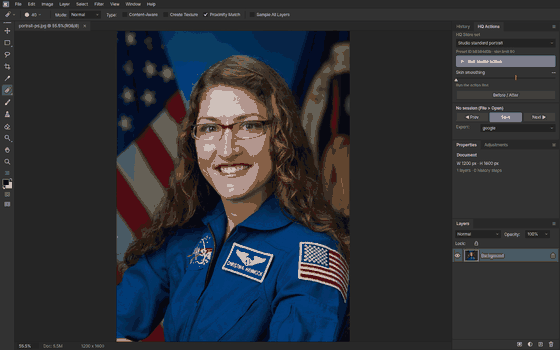
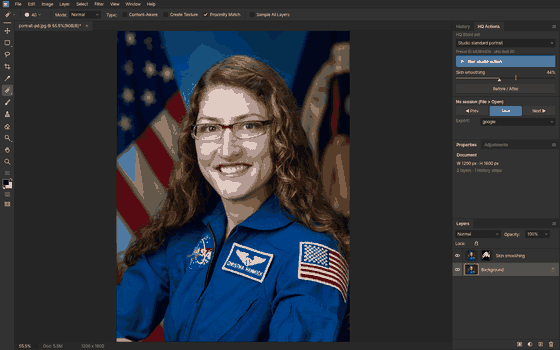
1. Studio action
- Press Run studio action in the HQ Actions panel.
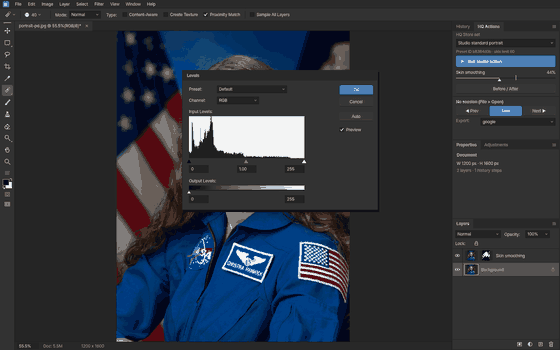
2. Levels
- Cmd+L opens the Levels dialog with Photoshop's fields.
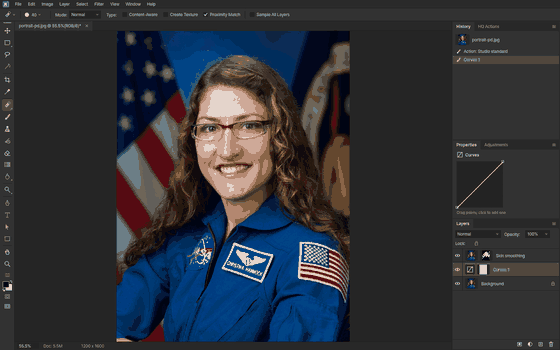
3. Essentials workspace
- Window > Workspace > Essentials shows every tool and the adjustment layers.
Sky Replacement, Define Custom Shape, Curves keys (PS-99-REST-A)
- Edit > Sky Replacement...: finds the sky joined to the top of the picture (the same colour rule as Select > Sky) and swaps in a new one. The six skies (Blue Day, Sunset, Overcast, Dusk, Dawn, Storm) are drawn by the app on the spot, so nothing is downloaded. Set Shift Edge (grow or shrink the sky's border), Fade Edge, Brightness, Temperature, Scale and Flip; raise Lighting Adjustment / Color Adjustment under Foreground Lighting and the ground near the horizon picks up the new sky's light. With Output To "New Layers" a masked "Sky Replacement" layer (and a "Foreground Lighting" layer when lighting is up) goes on top and the photo itself is untouched; "Duplicate Layer" makes one merged new layer. One undo takes it all back. If no sky is found nothing changes.
- Edit > Define Custom Shape...: names the outline of the active shape layer, the Paths panel's path or the selection and adds it to the end of the Custom Shape tool's list (sixteen at most, kept for next time). Pick it in the list and drag to draw it.
- Curves keys: + and Tab pick the next point, - and Shift+Tab the previous, the arrows move the lit point 1 step (Shift = 10), Cmd+D lights none, Delete removes the lit point (two always stay).
- Assistant:
sky_run:<sky>:<shift>:<fade>:<brightness>:<temperature>:<scale>:<flip>:<lighting>:<color>:<output>(only after the person's OK card),def_shape:<name>.
Shortcuts
As in Photoshop: V M L C I J B S E O H Z, Shift+letter (cycle the group), [ ], 0-9 (opacity), Space-drag, Option+scroll (zoom), Cmd+Z Shift+Cmd+Z Option+Cmd+Z, Cmd+0 Cmd+1 Cmd++ Cmd+-, Cmd+J Cmd+E Cmd+L Cmd+M Cmd+U Cmd+I, Cmd+G Shift+Cmd+G (groups) Option+Cmd+G (clipping) Cmd+] Cmd+[ Shift+Cmd+] Shift+Cmd+[ (order) / Cmd+/ (locks), Cmd+S Shift+Cmd+S Option+Shift+Cmd+W, Cmd+2-Cmd+9 (channels), Option+Cmd+2... (channel as selection), F6 F7 F8 (Color, Layers, Info panels), G (Gradient), Shift+Cmd+X (Liquify), Cmd+T (Free Transform), Shift+Cmd+T (Transform Again), Option+Shift+Cmd+T (duplicate and transform again), Option+Cmd+C (Canvas Size), Shift+C (Perspective Crop), Tab, F, X, D. Full table: docs/apps/retouch-ui.md.
Settings
Settings > Apps > Photo Retouch: Workspace (HQ store, Essentials), Light interface, Show keys (videos).
What it cannot do
keeping cropped pixels / Reveal All, multi-plane Perspective Warp, transforming smart object layers without rasterizing (type and shapes work), Perspective Crop on type (the type becomes pixels), a strength slider for the one-click looks (they are on or off), copying local edits (spot heal, brush, liquify) to other photos, thumbnails in the photo list (names only for now), RAW develop controls (exposure and white-balance sliders; for now one automatic develop), 16-bit editing, saving AVIF, face-aware automatic liquify are not there yet. Panels open docked only (no floating panel windows, no moving a tab to another group); the Libraries, Brush Settings and Styles panels, painting into one channel, and a profile-based CMYK in Info are not there yet. JPG, PNG and TIFF are flattened pictures: save as PSD to keep layers. In PSD files, blend-if ranges, knockout, mask feather and other adjustments (Color Balance and the like) are kept in the file but not drawn. Type and shape layers stay editable with the Type, Pen and Shape tools (the Type menu sits between Layer and Select, as in Photoshop); smart object layers show as pictures. To paint on one, rasterize it (Layer > Rasterize). 16-bit files are edited and saved in 8 bits; CMYK, Lab and 32-bit PSD open as one flattened picture (saving that as the same PSD loses its layers, so use Save As).
NanumOS 0.1.8349 · 2026-11-16